Bulldog Epoxy Instructions
|
Chip Colors are special composed of mica nano-particles coated with inorganic pigments to create pearlescent, iridescent, and translucent finishes that give that Custom look to enhance any floors. These unique pigments are designed to be field blended with a clear, high solids resinous floor coating, creating a beautiful finish with dramatic color effects.
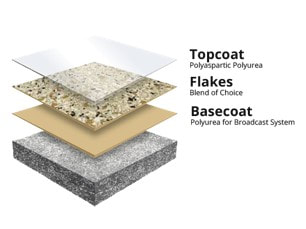
APPLICATION INSTRUCTIONS EPOXY123®: ESI recommends consulting your floor coating system salesperson regarding specific instructions, coating recommendations, and application methods. These application instructions are designed to be general guidelines that will vary depending on the specific coatings you choose. STEP 1: Paint Chip Color Preparation In order to avoid spotting areas, Paint Chip Colors should be pre-mixed into a throw bucket prior to application, using proper mixing procedures to avoid colors evenly through out flooring. STEP 2: Surface Preparation As with all high-performance floor coating systems, recommends mechanical surface preparation for optimal coating adhesion. In most cases, proper surface profiling can be achieved using a diamond grinder or shot-blaster. STEP 3: Paint Chip Colors Coat After the primer/basecoat is not cured, the Paint Chip should be coating & can be applied. The Paint Chip Colors are designed to be added to your base coat solids epoxy coating, depending on the kit size. The recommended application rate is 25-30 pounds per 250 square feet. This thickness will ensure the Paint Chip Colors evenly coating 100% of the desire surface. STEP 4: Clear Topcoat For enhanced durability, smooth texture, and a semi-gloss or matte finish, the dried Paint Chip Colors coating surface can be lightly screened or scraped and a clear topcoat may be applied. |
|